ToDo Application boilerplates using VueJS and Hasura-GraphQL-Engine
GraphQL has gained popularity in recent years due to easiness and flexibility it offers in developing client applications. Applications built with GraphQL APIs are easy to develop and maintain. In this blog post we willbuild a todo application using VueJS and Hasura-GraphQL-Engine. Hasura provides real-time graphql for postgres databases. We will go into details of how to use each component and building an application from it.
What is Hasura-GraphQL-Engine?

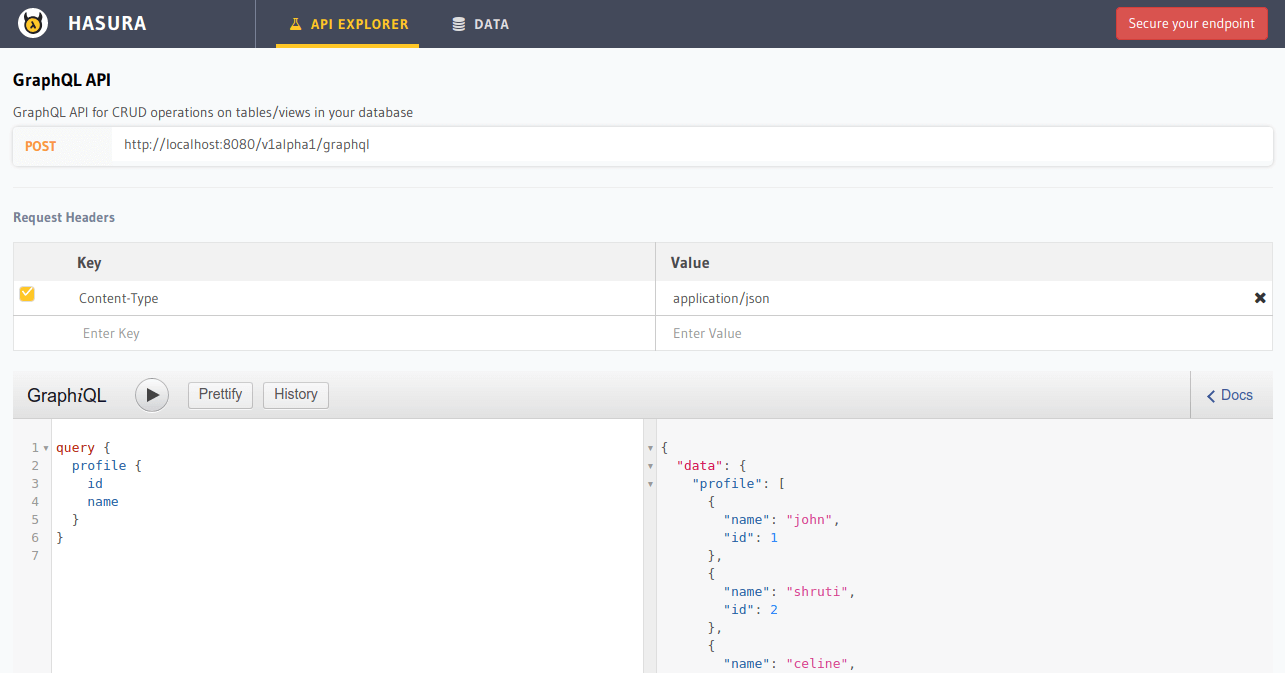
Hasura-graphql-engine provides a real-time graphql on your postgres databases. This allows you to develop awesome applications without worrying about backend. To see all the features hasura provides visit this link. Hasura graphql engine also provides you with GUI where you can run your graphql queries and edit your database tables.
Before we start with our vue application we need to setup hasura graphql engine that will provide us with a graphql api endpoint.
Setting up Hasura-GraphQL-Engine
Setting up Hasura graphql engine is really simple and offers various methods to setup the hasura console. You can setup hasura using docker, kubernetes and heroku. I recommend setting up Hasura using Heroku as it offers one click deployment. To setup Hasura using Heroku visit this link. To see other deployment methods visit this link.
ToDo application boilerplates
Link to download boilerplate
These application boilerplates have been developed to speed up the process of development with using Vue and Hasura. This includes three types of boilerplates which are given below:
- Hello-World: This contains the basic configuration that is needed to just setup an application which will connect to Hasura Graphql engine using apollo client. There is no database configuration involved in this boilerplate.
- Basic: Apart from the hello-world configuration this application contains the Queries, Subscriptions and Mutation examples for Graphql queries that we can make to Hasura engine. This application demonstrates these queries using a To-Do application.
- Advanced: Apart from what we did in Basic app this application contains Auth0 setup necessary for authorizing users.
Setting up the boilerplate
Setting up the boilerplate is very simple. All you have to do is just clone the boilerplate, install all dependencies and run the application. Here is the link to all the boilerplates. Below are the detailed steps for running each of the boilerplates.
Hello-World
This contains basic configuration need to run the vue application using hasura as backend. This contains basic setup for vue-apollo client. To run this application go to the hello-world directory and setup the environment variables used in main.js. Go to config/dev.env.js and place your environment variables there. After placing your environment variables run
npm install from the root directory and then execute npm run dev to run the application in development mode. You can now start adding your files and graphql queries for your application.
To read more about the structure of the application refer to README of the application.
Basic
Apart from basic setup we achieved in Hello-World boilerplate, in this application we develop a to-do application that uses graphql queries, subscriptions and mutations. Make sure you have hasura console running and add the tables in your hasura console. Complete details for database tables and hasura is given this section of README. After setting hasura console, setup the environment variables as we did in hello-world application. We can use
npm install to install dependencies and npm run dev to run the app. The queries, subscription and mutation used in this app are placed in src/graphql.js file.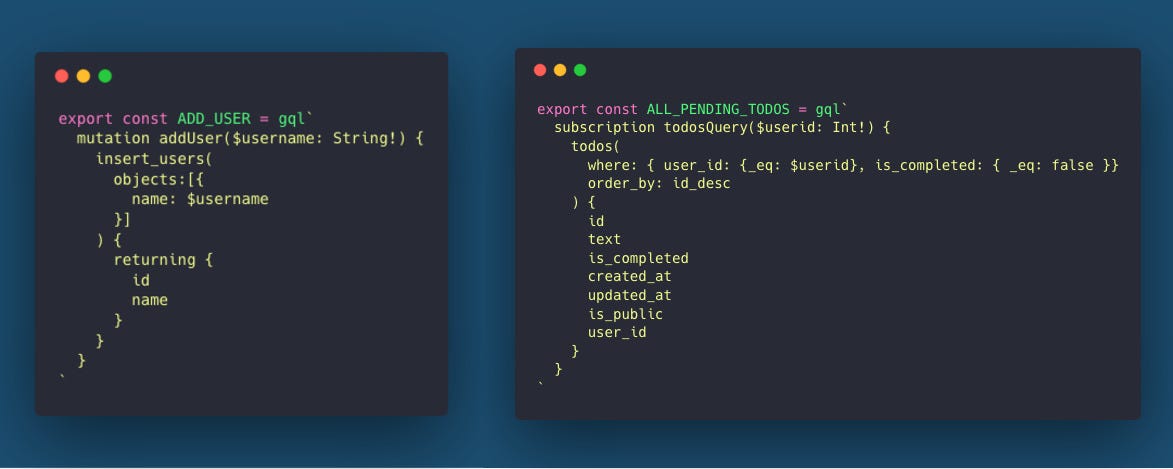
Functionalities in this application:
- User enters their name. If a user with same name exists it prompts user to login else user is provided with a signup option.
- After logging in user can add their todos and mark them as read.
- Users can delete their complete todos.

Advanced
This boilerplate has been built upon basic application boilerplate and uses auth0 for the authentication. Setup the auth0 following this tutorial. Make sure you have hasura console running and add the tables in your hasura console. Complete details for database tables and hasura is given this section of README. After setting hasura console, setup the environment variables as we did in hello-world application. Here you also need to setup auth0 variables in Auth/auth0-variables.js file. Instructions to setup this file have been mentioned here in the readme. Then we can use
npm install to install dependencies and npm run dev to run the app.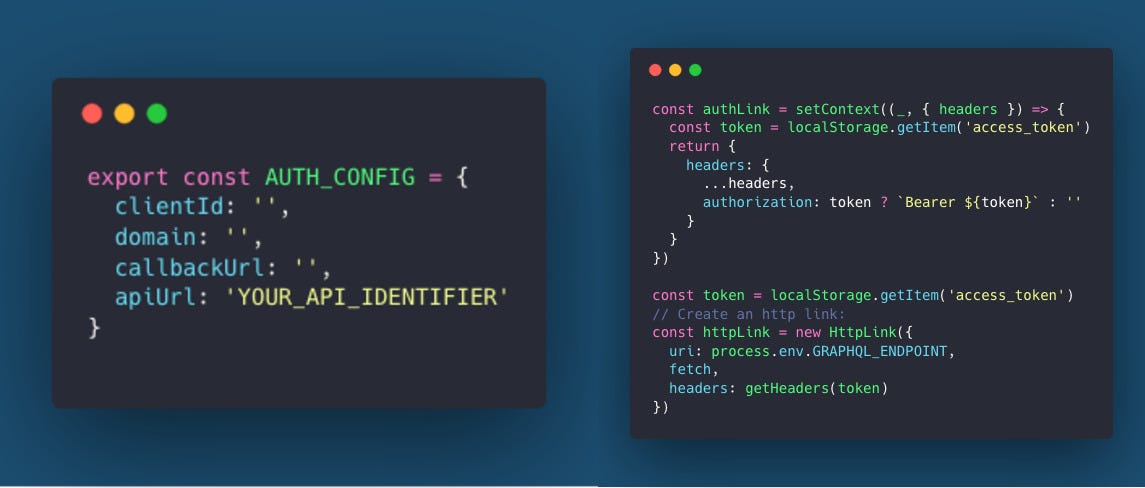
Functionalities in this application:
- Login/Signup using auth0.
- Adding todos and marking them as done.
- Deleting completed todos.
If you find these boilerplate helpful, do not forget to star the repository.
Troubleshooting
In case you face any issues, you can raise an issue on GitHub or reach directly to us.
About me
My name is Pradeep Gangwar, an Information Technology undergraduate student at Indian Institute of Information Technology, Allahabad.
I love to contribute to open source projects. I love developing things with Python and JavaScript.


Great insights on building a ToDo application using VueJS and Hasura GraphQL Engine! This combination ensures scalability and smooth performance. If you're planning a similar project, it’s smart to Hire VueJS Developers who can leverage GraphQL for efficient data management and seamless UI.
ReplyDeleteGreat read! This post provides a clear understanding of building ToDo applications using VueJS and Hasura GraphQL Engine. The seamless integration of front-end and back-end technologies is impressive. For scalable and efficient app development, businesses should Hire VueJS Developers to achieve similar excellence.
ReplyDelete